Install Eclipse
Download and install the Mars version of Eclipse for Java developers. After installing, to start Eclipse open a Terminal and type:
$ eclipse
Install WPILib Eclipse Plugins
From Eclipse, click on the menu Help -> Install New Software.... Click on the link for adding an Available Software Site, click Add, and enter the name "wpi_plugins" and a location of "http://first.wpi.edu/FRC/roborio/release/eclipse".
Click OK twice to return to the install software dialog, and click on the Work with: drop down list, select "wpi_plugins", click the checkbox next to the option "WPILib Robot Development", and click Finish to install.
Install Homebrew
Unfortunately the one thing Mac OSX is missing is a package manager (e.g. Ubuntu apt-get). There are several open source package managers available, but I usually use Homebrew. The instructions can be found on the web but basically involves one simple command (provided you already have Ruby installed):
$ ruby -e "$(curl -fsSL https://raw.githubusercontent.com/Homebrew/install/master/install)"
Install wget & unzip
The UNIX command wget is handy for fetching content from the web. While there are alternatives on Mac, I prefer to install wget using Homebrew. We will also install unzip and cmake while we are at it.
$ brew install wget
$ brew install homebrew/dupes/unzip
$ brew install cmake
Install XQuartz
Gazebo uses UNIX X-Windows, and so you will need an open source version of X. XQuartz provides a version of X-Windows complete with a packaged Mac install. Download and install XQuartz from the preceding link.
Install Gazebo
Gazebo is your robot simulator. Using Homebrew to install Gazebo is as simple as:
$ brew tap osrf/simulation
$ brew install gazebo6
To verify it runs, execute the following command from Terminal after the install completes:
$ gazebo
Install Gazebo Plugins
WPI provides a prepackaged download of the worlds, models and plugins required to simulate robot samples from previous years. The download has a few Ubuntu specific components which we will address below. But let's start by getting it installed:
$ cd ~/Downloads
$ wget http://first.wpi.edu/FRC/roborio/maven/release/edu/wpi/first/wpilib/simulation/simulation/1.0.0/simulation-1.0.0.zip
$ mkdir ~/wpilib/simulation
$ unzip ~/Downloads/simulation-1.0.0.zip -d ~/wpilib/simulation
Build Gz_Msgs
To compile and install gz_msgs for our platform, follow these steps:
$ cd ~/wpilib/simulation/gz_msgs
$ mkdir build
$ cd build
$ cmake ..
$ make install
I received a few compiler warnings on building that were safely ignored.
Install Sample Robot Models
These instructions directly parallel their Ubuntu equivalent.
$ cd ~/wpilib/simulation
$ wget -O models.zip \ https://usfirst.collab.net/sf/frs/do/downloadFile/projects.wpilib/frs.simulation.frcsim_gazebo_models/frs1160?dl=1
$ unzip models.zip
$ mv  frcsim-gazebo-models-4/models ~/wpilib/simulation/
$ mv  frcsim-gazebo-models-4/worlds ~/wpilib/simulation/
Build Mac OSX Plugins
The plugins you unzipped to ~/wpilib/simulation/plugins are compiled for Ubuntu Linux. You will need to replace these with Mac versions. I have provided two options: copying my pre-compiled versions or compiling yourself.
Copying pre-compiled versions:
$ cd ~/wpilib/simulation/plugins
$ wget http://www.hightechinthehub.com/frc-gazebo-plugins.tar
$ tar xvf frc-gazebo-plugins.tar
$ rm frc-gazebo-plugins.tar
Compiling your own versions
$ cd ~/wpilib/simulation
$ mkdir allwpilib
$ git clone https://github.com/PeterMitrano/allwpilib
$ cd allwpilib
$ ./gradlew -PmakeSim frc_gazebo_plugins
$ cp ~/wpilib/simulation/allwpilib/build/simulation/frc_gazebo_plugins/plugins/* ~/wpilib/simulation/plugins
Enable Controllers
If you have a game controller you'd like to use with your simulator, you will need the Mac OSX versions of the jinput.jar. You can do this by downloading the latest jinput build, and moving the files (jinput.jar, jinput-osx.jnilib, jinput-test.jar) into the ~/wpilib/simulation/lib directory. For example:
$ cp ~/Downloads/jinput* ~/wpilib/simulation/lib
Add Simulation To Default Path (Optional)
You will find it convenient to have ~/wpilib/simulation in the path. To do this:
open ~/.bash_profile
Add the following line at the end of your bash_profile:
export PATH=$HOME/wpilib/simulation:$PATH
Save and reload your environment to ensure the current terminal has the right path:
source ~/.bash_profile
Test Simulator with GearsBot
Follow these steps to test the robot simulator using the GearsBot sample:
Edit the Model
The robot models you installed are unfortunately hard-coded to the Unubtu plugins. To run a sample, you will need to perform a one-time edit to change the file names for the libraries. To do this for the GearsBot sample, use a text editor to edit the file ~/wpilib/simulation/models/GearsBot/model.sdf, and replace all ".so" references with ".dylib". This will ensure the model looks to the appropriate libraries.
Create an Eclipse Project
Start Eclipse:
$ eclipse
Click File -> New -> Other from the menu and type "robot" the search bar. Choose "Example Robot Project" and click Next, scroll to the bottom (CommandBased Robot), select "GearsBot" and click Next. You will be asked for your team number, which it will use in your Java package path. Give the project a name (e.g. GearsBotTest) and click Finish.
Prevent the Fixed Plane Defect
There is a defect that will quite likely be fixed by the time you follow these instructions. In my case I was seeing the robot go below the fixed plane when run in autonomous mode (it didn't snap to the plane). But just in case, search your project for any reference to "usePIDOutput", and change all references of this:
protected void usePIDOutput(double d) {
  motor.set(d);
}
to
protected void usePIDOutput(double d) {
  if (!Double.isNaN(d)) {
    motor.set(d);
  }
}
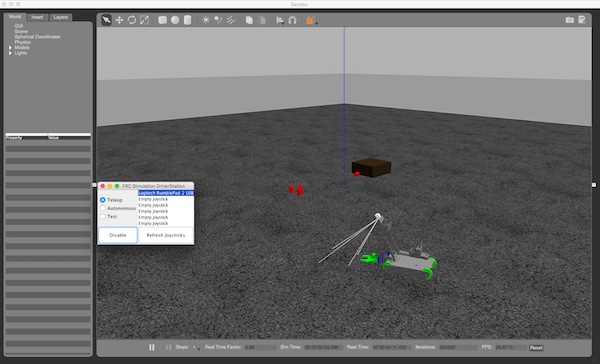
Start FRCSim
Let's start the GearsBot world from a terminal:
$ cd ~/wpilib/simulation
$ ./frcsim worlds/GearsBotDemo.world
Start the Driver Station
Let's start the Driver Station from another terminal:
$ cd ~/wpilib/simulation
$ ./sim_ds
Run the Eclipse Project
Now let's get the GearsBot project working. From Eclipse click on Run -> Run and choose "WPILib Java Simulation" as your target. This will start the code and initiate communication between the Gazebo simulator and Driver Station. You can test using autonomous mode by clicking on the Autonomous option in the Driver Station and clicking the Enable button. If you have plugged in a game controller, you should also be able to enable Teleop mode to test manually driving around your sim world using your robot.
Feel free to send me questions. A special thanks to Peter Mitrano for helping me along the way.
If you look in the Insert tab of Gazebo, you will notice all the elements of the 2016 field are available. You can also download the world file for 2016 from WPI.
